

Maximizing Space: Floor Plan Ideas for a 12m Container Tiny Home
Introduction
The global tiny home movement has inspired people to downsize, declutter, and reimagine what makes a living space truly functional and comfortable. Among the most popular options for compact living is the conversion of shipping containers into homes. The 12-meter (approximately 40-foot) shipping container, with its standardized dimensions—most notably, its 2352mm (about 7.7 feet) width—presents unique challenges and opportunities for ergonomic interior design. This article provides an in-depth exploration of floor plan ideas, design strategies, and space-maximizing techniques for creating a livable, efficient, and beautiful tiny home within these constraints.
Section 1: Understanding Container Dimensions and Their Impact
Before diving into floor plan ideas, it’s essential to understand the physical parameters of a 12m shipping container:
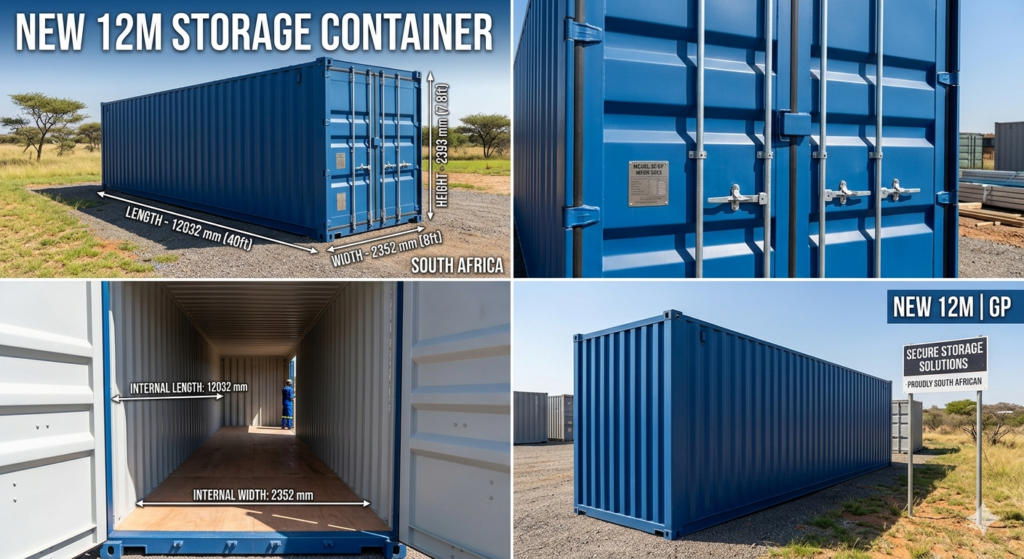
- Exterior Length: 12,192mm (40ft)
- Exterior Width: 2,438mm (8ft)
- Interior Width: 2,352mm (7.7ft)
- Interior Height: 2,393mm (7.8ft)
The usable interior width of 2,352mm is the primary constraint when designing the layout. Unlike typical residential spaces, this width influences everything from circulation aisles to furniture alignment and storage solutions. The key to successful container home design lies in leveraging every millimeter for both comfort and utility.
Section 2: Ergonomic Principles for Narrow Spaces
Ergonomics is about designing spaces to fit the people who use them, maximizing efficiency and minimizing discomfort. In a container home, this means:
- Optimizing Circulation: Ensuring there is enough room to move comfortably between key areas.
- Right-Sizing Furniture: Selecting or custom-building furniture to fit the narrow width.
- Multi-Functional Elements: Incorporating pieces that serve dual purposes or can be stowed away.
- Vertical Utilization: Using wall and ceiling heights for storage and utility.
- Natural Light: Maximizing windows and doors to make the space feel open and reduce claustrophobia.
Section 3: Core Layout Options for a 12m Container Tiny Home
- Linear (Railroad) Layout
- Description: Rooms are arranged sequentially from end to end, much like train cars.
- Pros: Simple construction, clear zones for privacy.
- Cons: Can feel like a corridor, limited natural light in central areas.
- Plan Example:
- Entrance/Living → Kitchen → Bathroom → Bedroom (at far end)
- Open Plan Layout
- Description: Minimizes walls, combining living, kitchen, and dining into a single space with a separate bathroom and bedroom.
- Pros: Maximizes perceived space, allows natural light to flow.
- Cons: Less privacy, requires careful zoning with furniture or partial dividers.
- Plan Example:
- Entrance → Open Living/Kitchen/Dining → Partitioned Bathroom → Bedroom
- Split Layout (Central Core)
- Description: Places the bathroom and utilities in the center, with living and sleeping areas at either end.
- Pros: Efficient plumbing, privacy for bedroom and living areas.
- Cons: Central core blocks through light, requires creative lighting solutions.
- Plan Example:
- Living Area → Central Bathroom/Kitchen → Bedroom
- Lofted Layout
- Description: Uses vertical space for a sleeping loft, freeing up the floor for living and utility areas.
- Pros: Increases usable area, adds storage underneath.
- Cons: Requires higher ceilings (high-cube containers preferred), ladder or stairs can take up room.
- Plan Example:
- Living/Kitchen Below → Lofted Bedroom Above
Section 4: Room-by-Room Design Strategies
Living Area
- Built-in Seating: Bench seating with storage underneath maximizes space.
- Fold-Down Furniture: Murphy beds or drop-leaf tables expand usability.
- Window Placement: Large windows or sliding doors on the long wall visually open up the space.
- Narrow Sofas: Choose slim-profile couches or custom cushions.
Kitchen
- Galley Style: Place cabinets and appliances on one or both sides, but keep aisle width at least 600mm for comfortable movement.
- Compact Appliances: Opt for two-burner cooktops, under-counter fridges, and combination ovens.
- Vertical Storage: Use upper cabinets and magnetic strips for tools.
- Fold-Out Counters: Extend workspace as needed, then tuck away.
Bathroom
- Wet Room Design: Combine shower, toilet, and sink in one waterproofed space to save room.
- Corner Fixtures: Use corner sinks and toilets to free up floor area.
- Pocket Doors: Sliding doors save swing space compared to standard doors.
Bedroom
- Platform Beds: Storage drawers underneath reduce the need for additional furniture.
- Lofted Beds: Especially in high-cube containers, these free up the floor for a desk or wardrobe.
- Built-In Wardrobes: Shallow closets with sliding doors fit the narrow width.
Multifunctional and Transitional Spaces
- Fold-Down Desks: Create an office that disappears when not in use.
- Sliding or Curtain Dividers: Flexibly separate spaces without permanent walls.
- Entryway Storage: Hooks, cubbies, and a shoe bench keep clutter contained.
Section 5: Storage Solutions for Every Inch
- Underfloor Storage: Raise the floor in select zones to create hidden compartments.
- Overhead Shelves: Above doors and windows, add shelves for infrequently used items.
- Built-In Cabinets: Custom cabinetry can fit exact dimensions, eliminating wasted gaps.
- Pegboards and Rails: Hang utensils, pots, or even bicycles to free up floor space.
- Stair Storage: If using a loft, build drawers or cabinets into the stair structure.
- Furniture with Storage: Ottomans, benches, and beds can all double as storage units.
Section 6: Lighting, Windows, and Optical Illusions
- Natural Light: Maximize with floor-to-ceiling glass doors, clerestory windows, or skylights.
- Strategic Mirrors: Place mirrors on long walls to visually expand the width.
- Recessed Lighting: Save headroom and keep the ceiling clean.
- Light Colors: Use whites and pastels to make the space feel larger and brighter.
- Translucent Partitions: Frosted glass or acrylic lets light pass between rooms while maintaining privacy.
Section 7: Climate, Insulation, and Comfort
- Insulation: Use thin, high-performance insulation to maintain width while ensuring comfort. Spray foam is popular for its thin profile.
- Ventilation: Install operable windows at both ends and consider a ceiling fan or mini-split system.
- Thermal Mass: Incorporate materials that absorb and slowly release heat to moderate temperature swings.
- Blackout Blinds and Shades: Essential for privacy and temperature control.
Section 8: Case Studies and Sample Floor Plans
- Solo Studio
- Target: Single occupant, minimalist living
- Layout: Entry into living/office, kitchen and bath at center, sleeping nook at far end
- Key Features: Fold-down desk, sofa bed, full-height storage wall, compact wet room
- Couple’s Retreat
- Target: Two adults
- Layout: Open-plan living/dining, galley kitchen, separate bedroom, bathroom at rear
- Key Features: Queen platform bed with drawers, breakfast bar, wardrobe with sliding doors
- Family-Friendly
- Target: Two adults + one child
- Layout: Living/dining at entry, kitchen, bunk beds in the center, bathroom at the end
- Key Features: Double bunk beds with storage, convertible dining table, stacked washer/dryer in bath
- Luxury Escape
- Target: High-end finishes, guest accommodation
- Layout: Partitioned entry, open living/kitchen, spa-style bath, sleeping loft
- Key Features: High ceilings, full wall of glass, custom cabinetry, underfloor heating
Section 9: Practical Tips for Container Home Builders
- Start with a Scale Plan: Draw the container to scale, including wall thickness and insulation layers.
- Mock Up Key Areas: Use tape or cardboard to test furniture layouts before building.
- Custom Build When Possible: Off-the-shelf furniture rarely fits perfectly; custom solutions maximize every centimeter.
- Invest in Quality Hardware: Sliding doors, Murphy beds, and hinges see daily use—choose durable options.
- Consider Future Flexibility: Design for easy reconfiguration as needs change.
- Embrace Minimalism: The less you own, the more comfortable and uncluttered your tiny home will feel.
Section 10: Conclusion – Living Large in a Narrow Space
Designing a 12m container tiny home within a 2352mm width is a challenge that sparks creativity and innovation. By leveraging ergonomic design principles, multi-functional furniture, and inventive storage solutions, it’s possible to craft a home that feels spacious, welcoming, and tailored to your lifestyle. Whether you’re building a solo retreat, a couple’s sanctuary, or a compact family residence, the key is to plan meticulously, prioritize flexibility, and always think vertically. With careful attention to every detail, your container home can embody the true spirit of minimalistic, sustainable, and joyful living. AquaCat Container Traders